Monday, April 15, 2024

Simon Says Stamp Monday Challenge: Cardboard Panel using Dina Wakley's Pocket Circles Stamp Set

Welcome, welcome to another Simon Says Stamp Monday Challenge!  This week we are tasked with making our own background.  I decided to go for a cardboard panel, which turned out like so:


I started by cutting the flap off of a cardboard box and ripping it apart to reveal some of the corrugated interior.  I added some white paint to the cardboard, then sprinkled on Infusions color stain and spritzed it with water.  When the paint is still wet and you add Infusions and water, you can mix the paint and Infusions and come up with all sorts of unexpected colors and shades from the Infusions grains.  And while that was drying, I found a scrap of Dina Wakley Ledger paper that I cut into an arch shape and doodled on with a black pencil.


I set that aside and decided to do some embossing on black paper.  I made some marks with an embossing pen, then shook on some white embossing powder and hit it with a heat gun.  I also stamped and fussy-cut out this dapper gent from Dina Wakley's Pocket Circles stamp set.  I colored around his face with Distress Watercolor Pencils.


I cut a wonky circle frame out of the black embossed paper and also found some pink polka-dotted paper from a previous project that I thought would look good.  And because I can't seem to NOT put pointy hats on people, I made a stripped hat for my guy here, too.


I assembled my elements to the front of the cardboard panel and decided to cut some little dome shapes, too.  I also made a scrap of hole-y (as opposed to holy) paper using a small hole punch.  


I put everything together and wanted to add a sentiment.  I stamped some words from Tim Holtz's Noble Gent stamp set, then cut up the letters and rearranged them so I could spell "Idea Hat," which seemed a fitting final statement for this panel.  I know that I would very much appreciate an Idea Hat that would generate new ideas whenever I put it on and would also retain any good ideas I had before I forgot that I had them!


Here are the supplies I used that you can find at Simon Says Stamp:

I'm excited to see how you make your own backgrounds this week!  Upload your creations to the Simon Says Stamp Monday Challenge Blog for your chance to win a $25 voucher to the Simon Says Stamp store!


Monday, April 8, 2024

Simon Says Stamp Monday Challenge: Spring Flowers Tag using Simon Says Stamp's Fine Floral Stem Dies and Tracy Evans' Quirky Birds Stamp Set

Snow is falling outside my window (it really is), but the daffodils are still managing to peek through all the gray.  That's perfect for this week's Simon Says Stamp Monday Challenge theme, which is "Spring Flowers."


I started with the flowers themselves, which were cut out of Strathmore Mixed Media paper using my Sizzix Big Shot and Simon Says Stamp's Fine Floral Stems dies.  I colored them using Daniel Smith watercolors.


While that dried, I worked on my background tag.  I cut a tag out of Strathmore Mixed Media paper using my Sizzix Big Shot and the Sizzix Tag Collection die set.  I got some dots going in the background by using Tim Holtz's Gradient Dots stencil and some Crushed Olive Distress Oxide spray.  Then I tore up some patterned paper (American Crafts' April and Ivy collection) and glued that down.  I also found a scrap of newsprint paper that I'd stamped some text onto and added that, too.  I made a bright red arch with paint to frame out my design a bit and added white paint to tone down the dark patterned paper.


I added more acrylic paint and tore off some of the patterned paper I'd just glued down at the top of the arch (I know, I know -- so pointless-feeling sometimes, but it's just how the process goes).  I also did some scribbling with a black Distress Watercolor Pencil.


With my watercolor-painted flowers now dry, I cut them up and glued them around my arch.  Next I wanted to try out Tracy Evans' Quirky Birds stamp set, so I stamped this cute little birdie onto white paper, fussy-cut it out, then painted it.


With my bird now in place among the flowers, I spritzed on some Dina Wakley Gloss Spray and this tag was done!


Here are the supplies I used, which you can find at Simon Says Stamp:

We'd love to see your Spring flower creations!  Upload them to the Simon Says Stamp Monday Challenge Blog for your chance to win a $25 voucher to the Simon Says Stamp store.


Monday, April 1, 2024

Simon Says Stamp Monday Challenge: Tag using Simon Says Stamps' Mushroom Stems and Simple Flowers Dies

"Whatever the weather" is this week's Simon Says Stamp Monday Challenge theme and we're also focusing on using Simon projects.  Living in a desert state that also provides a ton of snow in the winter, I am very familiar with constantly-changing weather!  Just today it hailed, then snowed, then rained, then was sunny, then rained again all within the space of about 5 minutes.  So I decided to make my tag look a little chaotic, but focused on the sun (represented by the flowers) and rain (incorporated by a mushroom) for the nature elements.


I started by cutting and painting some simple flower shapes, along with a mushroom.  Both die sets are from Simon.  I had a dark brown watercolor-y background scrap I painted that I wanted to use for this project because it reminded me of dirt.  I also found a Tim Holtz photo booth picture to utilize.


For the easiest tag background in the history of the universe, I reached for Simple Stories' Color Palette Designer Tags kit and cut out one of the tags.  I really like this paper collection, so I also pulled in a piece of gingham patterned paper from the Color Palette 6x8 paper pad.


I glued and layered, added my mushroom behind my watercolor "dirt scrap", then added some more paint to blend everything together.  I added a scallop, some scribbling (I used Distress Watercolors for some of the scribbles) and doodled some polka dots to finish off my tag. 


Here are the supplies I used that you can find at Simon Says Stamp:


Monday, March 25, 2024

Simon Says Stamp Monday Challenge: Emboss It Card using AALL & Create's Numberama Die Set

"Emboss it" is our theme this week over at the Simon Says Stamp Monday Challenge Blog.  I made a card with some hand-drawn marks that I heat-embossed and collaged together.


I started with the background, which I made with acrylic paint that I added water to and then sort of streaked and smeared up and down the page.  I also shook on some Infusions color stain, spritzed it with water, and moved that around the page with a wet brush so that it acted like watercolors.


And now for the embossing!  I love using embossing ink pens because they give you the freedom to draw whatever shape you want, and then you can add embossing powder and heat set it.  I did this with black plus-signs and white rings.


For the background of the card, I cut this fabulous funky-edged frame (Numberama from AALL & Create) out of Strathmore Mixed Media black paper.  I added some more heat-embossed white doodles to the black paper, then glued a piece of my painted paper and some embossed-paper scraps onto it.  I added some Distress Crayon and Distress Watercolor Pencil scribbles here and there for some more pops of color.


I cut an arch shape out of Dina Wakley's collage paper and glued that on top.  I added some more paint and then stamped on a Tim Holtz sentiment to finish off the card.


Here are the supplies I used that you can find at Simon Says Stamp:

Embrace embossing this week and upload your creations to the Simon Says Stamp Monday Challenge Blog for your chance to win a $25 voucher to the Simon Says Stamp store!


Monday, March 18, 2024

Simon Says Stamp Monday Challenge: Tea Bag Quote Ribbons

This week's Simon Says Stamp Monday Challenge theme is food and drink.  I decided to make some quote ribbons out of tea bags (imaginary drum roll) and here they are!


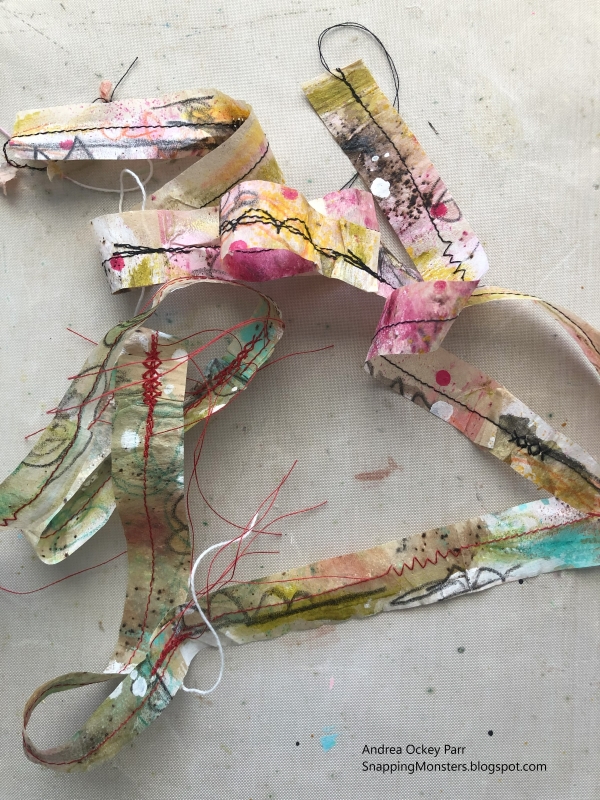
What in the world is a "tea bag quote ribbon" anyway?  Well, I decorated tea bags, cut them up, sewed them back together in a long ribbony shape and stuck quotes on them, hence the name.  I love using tea bags in my crafty creations because they have such great texture and are made to handle water and paint and whatever else you want to throw on them.  Yet they're still light and delicate enough to be able to do things that paper just can't do.  And so it began...

I started with a plain tea bag that you can make your own tea in (if you wanted to use them for their intended purpose, which I never have).  I cut the bag up the two longer sides, laid it out flat, and added some paint.


Next I shook on some Paper Artsy Infusions color stain, which I spritzed with water and then let dry.  Since the Infusions stain powder has little brown granules in it, it looks very tea-ish and right at home on a tea bag, in my opinion.


When that dried, I got things wet again by spritzing on some Distress Oxide sprays and scribbled around with Distress Watercolor Pencils, which I then added water to.


While all that was drying, I made another tea bag in tones of teals and greens and followed the same process.  Then I splattered on some Snow Cap Alcohol Ink Mixative for the white splotches.  My apologies for the blurriness of the photo!  It is not your eyes that are the problem; the problem was me snapping pictures too fast!


My next move was to cut the bags into four strips each.


Then I used my sewing machine to sew them back together end to end to form two long ribbons.  Just for funsies, I used red thread on one ribbon strip and black thread on the other.


I thought it would be nice to add some quotes to the ribbons, so I stamped this favorite quote onto a piece of fabric, which I then cut up and glued to one of the ribbons.  This quote comes from Tim Holtz's Purely Random stamp set - an oldie but a goodie.  If you're familiar with that set, my words are configured differently than the quote stamp because I cut the quote stamp up years ago so I could stretch the quote out longer if I wanted to or stamp the words to fit into different areas.  I used Ranger Jet Black Archival Ink, which works fine on fabric if you're not planning to wash it or use it on clothing-type stuff.


I stamped another sentiment from Tim's Theories stamp set onto fabric and cut that one out, too.  Then I glued the long quote to the green ribbon and the other quote to the pink ribbon.  The green ribbon quote was too long to show adequately in a photo, but you get the gist of how it looked.


Once these ribbons are done, you can use them in all sorts of projects.  To store them, you can wind them around thread spools or old button cards or whatever you want to wrap them around, but I decided to whip out the Spellbinders Stitched with Love Bobbin die and stamp set to make cute little cards to hold these ribbons.  I cut the bobbin cards, stamped them, and colored them with some paint.


My ribbon and their holders were done!


Was this the easiest way in the world to make ribbon?  Um, no.  But that's not why we make things.  We make things because we know we will FEEL something at the end of it...even if it costs us ten times more and twenty times longer to make than if we would've just bought it, right?  Yes!  So craft on!  It's worth the struggle and it's worth the investment of YOU to make something that didn't exist before.  

Here are the supplies I used that you can find at Simon Say Stamp:

Be sure to upload your projects that tie into the food/drink theme to the Simon Says Stamp Monday Challenge for your chance to feel that sense of accomplishment and to be entered to win a $25 voucher to the Simon Says Stamp store.